Hit Counter

Thursday, September 9, 2010

Only 92 Cents!!

Would you believe I came home with all this for 92 cents?  Well, I did!  I went to Rite Aid today, armed with my sale paper and coupons.  The Right Guard Deodorant is normally $4.49 each.  They were on sale buy one get one free.  I also had (2) coupons for $3 off 2 Right Guards.  I also had (1) coupon for $1 off Right Guard.  The Finish Dishwasher Kit is normally $10.99 each, on sale buy one get one free, so they ring up at 1/2 price.  Then I had a $3 off coupon for that.  I also had a coupon for $4 off a $20 purchase.  Using all this, I paid just 92 cents, plus I got $2 UP Rewards good toward my next purchase.  So really, I got paid $1.08 to buy all this stuff.  Isn't that great!?

Wednesday, September 8, 2010

My New, Old Hope Chest

My mom gave me this hope chest when I got married.  It was hers before she got married.  It is great for extra storage, but as you can see, it was needing a facelift.

The top was the worst, you can see the finish is so worn.  At one point a couple years ago, one of my kids (I don't remember which one) had gotten a green marker and traced their handprint on the top.  Of course when I first saw it, I was upset, but I never washed it off, thinking that one day I would see it and remember how small the kids once were.  Sadly, it has worn away and no longer there.  So now I was free to paint or recover it without regret of that little memory.


First I called my mom to make sure she would not be upset it I painted her hope chest.  She said of course not, it was not hers anyway.  So I got down to business.  First I picked up some fabric I loved, and found some paint to match.  I took off the top and all the hardware.  This was my first attempt at upholstering anything, and I must say it really was easy and I love the way it turned out.  Then I primed and painted the whole thing and gave the hardware a coat of Oil Rubbed Bronze spray paint.  That stuff is beautiful!


It is black, but has specks of metallic in it, almost like a hammered look.  It looks better in real life.  And please forgive the quality of these photos.  They were taken with my phone, because I couldn't find any batteries for my camera.

Isn't that a huge difference?  I love the way it turned out.  It is now sitting at the foot of my bed.  It was supposed to function as a bench for putting on shoes or whatever, but mostly it just holds laundry baskets full of clothes waiting to be put away.  But at least it looks pretty while doing it!


I have some of this fabric left over, so I'm thinking about making some pillows with it and freshening up my room a bit.  If I ever get around to that I'll let you know.  And if I ever get batteries I'll take some real pictures so you can see what it really looks like. 

My next post is going to be my new Fall Wreath I made.  I'm in love with it.  But first I need batteries.  Thanks for stopping by!

Linking up to Transformation Thusdays @ The Shabby Chic Cottage and Miss Mustard Seed's Featured Furniture Friday.

Friday, September 3, 2010

Coupons, coupons and more coupons!

So lately I have become slightly obssessed with coupons.  At any given time you might walk into my kitchen to find the table top covered with clipped coupons, sale papers and shopping lists for individual stores.  I scour the sale papers for all the local drug stores, compare my coupons to the sales going on and then hop from store to store.  With all the reward programs going on and the coupons and sales combined, it's really quite amazing how much money you can save!

I've started keeping a list of where I went shopping, how much I saved on sales and coupons and how much I actually spent.  Now I wouldn't have necessarily bought all the things I did if they weren't on sale combined with the coupons, but when I do need that particular product, I already have it, and won't have to go pay full price! 
 For example, yesterday I went to Publix.  Did you know they take competitor coupons?  And, you can "stack" coupons, meaning you can have on manufacturer and one store coupon for the same item.  So back to my shopping trip.  I only bought what was on sale and for 95% of those items I also had coupons.  My total trip would have cost $128.28 but with the regular sales I saved $47.58 then my coupons saved me another $33.79 for a total of $81.37 saved!  I only paid $46.91 for $128.28 worth of groceries!

I also went to Rite Aid the other day.  The regular sales saved me $6, the coupons saved me $26.10 for a total of $32.10 in savings.  I spent $19.65 on what would have cost $51.71!

I only wish I had discovered this sooner.  There is a coupon class in Savannah they hold about once a month and I'm going to go to it so I can learn even more ways to save money.  Do you coupon?  I don't think I can ever shop the same way again!

Friday, August 27, 2010

Plugging Away

I love to read blogs when it gives a glimpse into someone's personal life.  It's like reading a good book, only you know that person is real, and you can relate on some level.  There have been some major changes in our lives in the past year, but the Lord has been good.  I have thought about blogging, but hesitate because I want to be "real," but at the same time, how much about my personal life do I want to reveal?  I realize most of the people who read this don't know me, and it really wouldn't make a difference, would it?  For those that do know our family, they probably already know some of the details.  I want to get back to my blog, I really do enjoy posting pictures and telling about what's going on.  I just have to decide how honest am I going to be?  Am I going to post only the good times or really tell it all?  I'm going to think about these things and get back to you real soon.  I also have some projects I've worked on, and want to post those things as well.

Thursday, May 13, 2010

Adorable Hand Bags

A lady in our church has started having a Lady's Bible Study and Craft Time once a month.  I went this past Friday, and it was so nice to get together with all the Lady's and have some adult time and a small Bible Study.  The craft we made was this adorable tote bag.  If you are interested, the tutorial is here.  The only thing I did differently was I made the handles 11 inches.  This left enough ribbon to make a nice bow.  I also just stitched down the side seam allowances.  I felt like it gave it more of a finished look.  After  I made the first one, I just had to go get more supplies to make my daughter, nieces and sister one.  I need to make 3 more, but they are so easy and cute I can't wait to get them done.  Plus they only take about 15 to 20 minutes to complete!  This green polka-dot bag was the first one I made.
I decided to go with the loepoard print for my sister.  The black shiny button really dresses things up, doesn't it?  I may need to duplicate this one for my mom.  I still haven't decided what to make for my other sister, but she's in boot camp right now, so I have a few weeks to get it done!


And of course, since my daughter's favorite colors are yellow and blue, this little cutie is just for her.  I just love the flower buttons on the bow!


I'm linking up to Kimba's DIY Day and Becca's Show and Tell

Saturday, February 13, 2010

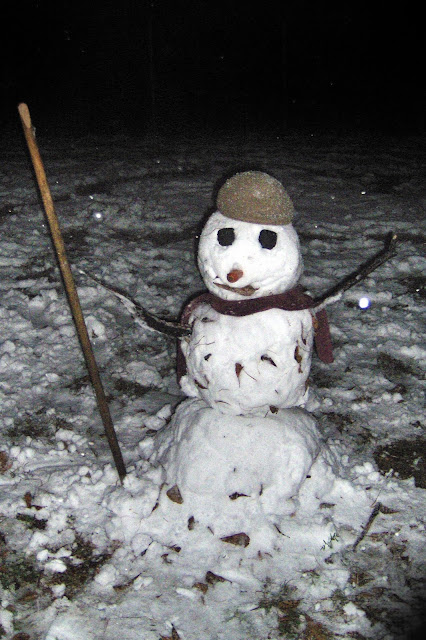
Let It Snow!!


Hi everyone!  I have some fun pictures to share with you today.  I'm sure you have all heard about all the snow everyone is getting.  Well, we were eagerly awaiting the moment the snow would arrive here in our neck of the woods.  We don't get to see snow very often.  In fact, we haven't had enough of the stuff to build a snowman since 1999 or 2000.  So when the flakes started falling around 7pm last night, the kids were out the door like a shot!  It's usually not exytremely cold here, so we weren't prepared with gloves and scarves and things of that nature.  So they got socks for their hands and every few minutes came in and used the dryer for their wet socks or else just got new ones.  This morning they better not say they can't find any clean socks!  Anyway, when Hubby and I got finished laying the tile in our bathroom, we decided to go and join them!


Even Lilly Dog got in on the action!


After we completed our own little snowman, we sent Amanda to the neighbors to see if they could come out and play with us.  A great snowball fight followed, and then we got right down to business working on the best snowman in Beaufort!
It really was fun!  Of course we then came insided and warmed by the fire with nice Hot Chocolate.  Finally we ended the night with a game of Farkle until almost 3am!  What are friends for?

Wednesday, February 3, 2010

Pretty Key Hanger

When we first moved in this house about 4 months ago, Sam put a nail in the wall to hang keys on.  That nail has been botherin me ever since.  So I picked up this little key hanger from Wally World the other day.  Bubba informed me that Daddy could make it, but I told him I'd rather pay $5 for it now than wait 6 months to get it!  So anyway, I knew I wanted to pretty it up with some of my favorite paper from Stampin' Up!  Can you guess what paper I went with? 
First I used my Always Artichoke marker to color all the edges, so that if you looked from the side, it wouldn't be plain wood.  Then I traced the shape into my paper, then cut it out and used Mod Podge to attach.  I then used my nail file to get all the edges just right.  Then I sponged some Always Artichoke on the edges and applied another coat of Mod Podge on top.

I dug out my Pretties Kit and applied some halfback pearls along the bottom and tied Very Vanilla Ribbon on each hook.  It still looked like it was missing something, so I decorated a hat pin and stuck that through the ribbon.

It really looks alot better than just a nail in the wall, don't you think?  And yes, I shoved everything that was on the counter over to the side so you can't see all my mess!

I was working on this while the kids were doing schoolwork, and in typical "man" fashion, Bubba couldn't understand why in the world I was taking the time and energy to decorate it when I could have just hung it up plain and would have worked fine!  Such a typical man!

Tuesday, January 19, 2010

A Few Changes

Unfortunately, I have had to make a few changes here on my blog.  Your comments will no longer be visible immediately, I have changed the settings for moderator approval.  You will also now have to fill out the word verification.  I have had several comments left recently that were not appropriate and had to remove those comments.  Hopefully this will deter whoever is leaving this spam.  I think it's very sad when a stamping blog gets the kind of comments that I would have to remove, but in this day and age, I guess it's to be expected.  Anyway, I hope this takes care of it, and if any of you saw those comments, I apologize.

Calendar Bookmark

I have here an adorable little bookmark calendar.  Isn't it cute?  I really like the frayed ribbon on the top.  I was browsing Split Coast Stampers for some ideas for my club on Friday night, and came across the template for these little calendars.  I figured since we're still in Jan. it's not too late for this little project. 


There's not really any explaining that needs to be done, except I used Brocade Blue Paper and Ink.  For the solid butterfly image I stamped off once, then the outline was applied with the second stamp.  For the frayed ribbon, you have to use grosgrain.  All you do is cut off one edge of the ribbon, then pull out all the fibers.  Make sense?  If not let me know and I'll take some pictures and do a mini tutorial.  Thank!

Monday, January 18, 2010

I Made a Card!

I can't tell you the last time I sat down and made a card.  Well, today the kids were off school, so Sam took the boys with him to work on a roof he's doing.  As soon as he left I got right down to business.  Because last week I took the time to organize my stuff, I actually knew where my supplies were.  So I browsed Split Coast Stampers and got some inspiration.  I've been wanting to use the Sticky Cuts at Stamp Club for quite some time, so this is what I came up with.


I used Stampin' Up!'s Sticky Cuts Letters with their ultra fine glitter.  The stamp set is Define Your Life and card stock isTempting Turquoise and Elegant Eggplant. The ribbon is something I picked up at Michael's a while back.  I also used the Eyelet Border Punch along the bottom.


I know this isn't the greatest picture, but  I wanted to show you eyelet border letting the Turquoise show through.  I also have another little project planned, so if I get it done I'll show you tomorrow.  These are both what we'll be working on this Friday for our Stamp Club.

Thursday, January 14, 2010

Still Unmounting!

Well, I couldn't resist showing you the progress I made today with my stamps.  I used up all the CD cases I bought.  So now I can do other things, like wash the dishes and fold the laundry!  Sounds fun, doesn't it? 


Here are all the empty stamp cases so far.  I have to figure out what to do with these now.


Now, look at how much space they use compared to what they used before unmounting!  Plus I think it will be much easier to use what I have because I won't have to worry about dragging all those boxes out to find what I want then put them away again.  I never can find the set I want.  Now at least they will be much easier to get to then put back up!

I also need to figure out what to do with all these wooden blocks.  I have one idea for a few of them, but this many is ridiculous.  Imagine how many I'll have when I'm all done!  I gotta go now.  Let me know any ideas you may have about those cases or wooden blocks.  See you later!

Unmounting Stamps!!

Well, I'm back!  I have organized all my paper, and believe me, that was a job.  But now it's all done, and if (when) I decide to stamp something, at least I can find the color I want.  I also have started a whole new project.  I had been thinking about unmounting my stamps to save room on storage, but I was always hesitant.  But now, with Stampin' Up! deciding to go with clear mount stamps, I decided I'd buy the acrylic blocks and take the plunge.  I'm now in the process of unmounting all my stamps.  It's really easy, and as you can see, it will save a ton of room.

This is the pile of stamps I did this morning.  Before I started, it was as tall as my ruler.  When I was done, it was only about 5 inches tall!  How cool is that?!  Plus, now all the boxes are the same size, so much easier to stack neatly.  You can see the original Stampin' Up! labels on some of them, what I did was peel the label off the original plastic container, then I stuck that to some white paper and stuck it inside the case.  Some of my labels ripped while peeling, so I just started handwriting the names and attaching those instead.

I have four of these neat little crate looking boxes that are the perfect size for CD cases.  I'm sure that will be enough room for all my stamps when I get them done.  Right now I have two of those under the bed boxes full of stamps.  I'll let you know how small it gets down to.

This is one of the cases that's done.  I just cut some whisper white CS to size and stamped all the images onto it before I  unmounted them.  I found the tutorial here.  It's a great video, and I pretty much followed her instructions.  The only thing I did differently was  I stamped my images before I unmounted them because I don't have any acrylic blocks yet.  Super easy, and I think it will be worth the time when I can keep all my stamps on my desk!