Hit Counter

Tuesday, January 19, 2010

A Few Changes

Unfortunately, I have had to make a few changes here on my blog.  Your comments will no longer be visible immediately, I have changed the settings for moderator approval.  You will also now have to fill out the word verification.  I have had several comments left recently that were not appropriate and had to remove those comments.  Hopefully this will deter whoever is leaving this spam.  I think it's very sad when a stamping blog gets the kind of comments that I would have to remove, but in this day and age, I guess it's to be expected.  Anyway, I hope this takes care of it, and if any of you saw those comments, I apologize.

Calendar Bookmark

I have here an adorable little bookmark calendar.  Isn't it cute?  I really like the frayed ribbon on the top.  I was browsing Split Coast Stampers for some ideas for my club on Friday night, and came across the template for these little calendars.  I figured since we're still in Jan. it's not too late for this little project. 


There's not really any explaining that needs to be done, except I used Brocade Blue Paper and Ink.  For the solid butterfly image I stamped off once, then the outline was applied with the second stamp.  For the frayed ribbon, you have to use grosgrain.  All you do is cut off one edge of the ribbon, then pull out all the fibers.  Make sense?  If not let me know and I'll take some pictures and do a mini tutorial.  Thank!

Monday, January 18, 2010

I Made a Card!

I can't tell you the last time I sat down and made a card.  Well, today the kids were off school, so Sam took the boys with him to work on a roof he's doing.  As soon as he left I got right down to business.  Because last week I took the time to organize my stuff, I actually knew where my supplies were.  So I browsed Split Coast Stampers and got some inspiration.  I've been wanting to use the Sticky Cuts at Stamp Club for quite some time, so this is what I came up with.


I used Stampin' Up!'s Sticky Cuts Letters with their ultra fine glitter.  The stamp set is Define Your Life and card stock isTempting Turquoise and Elegant Eggplant. The ribbon is something I picked up at Michael's a while back.  I also used the Eyelet Border Punch along the bottom.


I know this isn't the greatest picture, but  I wanted to show you eyelet border letting the Turquoise show through.  I also have another little project planned, so if I get it done I'll show you tomorrow.  These are both what we'll be working on this Friday for our Stamp Club.

Thursday, January 14, 2010

Still Unmounting!

Well, I couldn't resist showing you the progress I made today with my stamps.  I used up all the CD cases I bought.  So now I can do other things, like wash the dishes and fold the laundry!  Sounds fun, doesn't it? 


Here are all the empty stamp cases so far.  I have to figure out what to do with these now.


Now, look at how much space they use compared to what they used before unmounting!  Plus I think it will be much easier to use what I have because I won't have to worry about dragging all those boxes out to find what I want then put them away again.  I never can find the set I want.  Now at least they will be much easier to get to then put back up!

I also need to figure out what to do with all these wooden blocks.  I have one idea for a few of them, but this many is ridiculous.  Imagine how many I'll have when I'm all done!  I gotta go now.  Let me know any ideas you may have about those cases or wooden blocks.  See you later!

Unmounting Stamps!!

Well, I'm back!  I have organized all my paper, and believe me, that was a job.  But now it's all done, and if (when) I decide to stamp something, at least I can find the color I want.  I also have started a whole new project.  I had been thinking about unmounting my stamps to save room on storage, but I was always hesitant.  But now, with Stampin' Up! deciding to go with clear mount stamps, I decided I'd buy the acrylic blocks and take the plunge.  I'm now in the process of unmounting all my stamps.  It's really easy, and as you can see, it will save a ton of room.

This is the pile of stamps I did this morning.  Before I started, it was as tall as my ruler.  When I was done, it was only about 5 inches tall!  How cool is that?!  Plus, now all the boxes are the same size, so much easier to stack neatly.  You can see the original Stampin' Up! labels on some of them, what I did was peel the label off the original plastic container, then I stuck that to some white paper and stuck it inside the case.  Some of my labels ripped while peeling, so I just started handwriting the names and attaching those instead.

I have four of these neat little crate looking boxes that are the perfect size for CD cases.  I'm sure that will be enough room for all my stamps when I get them done.  Right now I have two of those under the bed boxes full of stamps.  I'll let you know how small it gets down to.

This is one of the cases that's done.  I just cut some whisper white CS to size and stamped all the images onto it before I  unmounted them.  I found the tutorial here.  It's a great video, and I pretty much followed her instructions.  The only thing I did differently was  I stamped my images before I unmounted them because I don't have any acrylic blocks yet.  Super easy, and I think it will be worth the time when I can keep all my stamps on my desk! 

Tuesday, December 8, 2009

Life Got in the Way!

Hello everyone!!  I know, I know, it has been way, way too long since I posted last.  What can I say, life happens!  We have moved into a much smaller house, and that meant alot of going through closets, and we still are not done with that.  Add in all the work that had to be done to the house before we could move in, plus the packing, moving, unpacking, etc.......  Plus we have had to keep up with our schoolwork, which in itself is a full time job!  Things are starting to get back to somewhat normal as we settle into a daily routine, and I'm thinking about Stamping again.  That has really taken a back seat for the past two months.  Way, way in the back!  But we are having our meeting this coming Thursday, so I'm getting back into the swing of things, I think.  If there's anyone left out there who checks on me anymore, I'll try to be a good girl and post at least once in a while.   I still don't have all my stamp supplies here at the new house, because I just don't know where to put it all.  So  I can't promise anything grand, but I'll try.  For now, though, I have to finish school with the kids, do my chores, then a friend is coming over later for a perm and haircut.  So I'll see you folks later.  Bye!

Tuesday, September 15, 2009

School Drawings

I thought these drawings were so cute. Amanda has SC History in school this year, and she's learning about Native American tribes that lived in the area. Here is her picture of the Yap Ye Iswa Festival. It is a festival held every year by the Catawba People. Her explanation is pretty simple, don't you think?
The next one is her "Poster" to help raise awareness of things you can do to help the environment. I love the way she labels all her drawings!

That's it for now. School is keeping me very busy this year. Now I have to go figure out what's for dinner. See you later!

Saturday, September 12, 2009

Mini Albums

Hello!! It's been so long since I last posted. We have been busy with school and this past month has just flown by. I can't believe we've finished 4 weeks of school already!! Last night was our Stamp Club and we had a really good time. It was nice to get some adult time and visit with my friends and family. Thanks for a great time, ladies! Now, on to the projects: We made these cute little mini albums. They're made from a sheet of 12 x 12 card stock, and very easy to do.


I don't really remember who's is who's, and I know they are not all here, but some of my pictures were really blurry. Sometimes my camera just doesn't cooperate.

We used up what I had left of a Simply Scrappin Kit from a few years ago. Sometimes those kits just last forever!!
Look at that cute page withe plaid flowers!! Dee and Kelly came up with that one, and I think it's just too cute!

I also have to thank Lisa for helping my newbie out lately. Sometimes it's hard to give one on one attention when trying to show a whole group what to do. You were a big help, Lisa!

Here's my whole group of Ladies. We had a really good time and I'm looking forward to our next meeting. Until next time.......

Monday, August 24, 2009

A Dress for Amanda

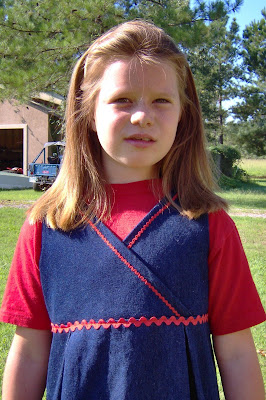
I know this isn't stamping related, but it is crafty. Amanda has been needing some new dresses, and when I saw the dresses Aubrey made for her daughter, I figured I'd break out my sewing machine too. Except I used a pattern. I'm not that brave to make a dress with no pattern. I got this nice jean fabric at the Goodwill store several months ago for $1. I already had the pattern from a dress I made for a friend's daughter about a year ago. So this dress was made for the cost of the ric rac and zipper plus $1 for fabric. About $4 total.
It was very easy to put together. It took no time at all until I got to the zipper. I HATE ZIPPERS!! It took me as long to put in the zipper as it did to make the whole dress, and it's still not right! As you can see, the top didn't come out even,
Which made the ric rac in the back not even!! Plus there is a pucker right below the ric rac on the left side. I may take the whole zipper out and redo it, or I may take the whole dress to my mom who can sew anything that needs to be sewn. See this post to see what I mean.
Well that's all I have time for today. Come back soon and see what I've been up to!

Saturday, August 22, 2009

Homemade Butter

Happy Saturday to you!! I'm so glad today is Sat. because that means no schoolwork! We completed our first week. It's always hard to get back in the routine of school after summer vacation. Anyway, today Sam took the boys to mow the lawn at church, so I stayed home and folded some laundry and made some homemade butter with Amanda. You start out with heavy whipping cream. You pour it into a bowl that is bigger than what you think you need, because it gets pretty puffy when you are whipping it. I should have used a bigger bowl but didn't want to dirty another one after I realized it. Now that's lazy. Amanda started out with the whipping, but pretty soon her arms were tired and I took over. You just whip and whip. It usually takes about 10 - 15 minutes with the mixer on high.

See here how it has gotten fluffy? It's starting to thicken....

Here you can see its still getting thicker and has more texture to it.....If you stop here and add sugar you have some great whipped cream for your desserts.....

Then the fluffiness goes down and it still gets thicker.....

It begins to resemble cottage cheese, and you know you're getting close. Once it starts to change, it goes fast!

Suddenly, you have butter and buttermilk. All you have to do is kind of mush the butter together into a clump and pour off the milk.

I always save the buttermilk. It makes great biscuits and pancakes. If you use regular pancake mix, except use buttermilk instead of water, they get really fluffly. Bubba loves his pancakes that way!

Next, you have to rinse the butter with some ice water. Make sure the water is really cold. This helps the butter to clump together.
You just kind on knead the water into the butter, then pour the water down the drain. I usually do about 3 rinses. If you don't wash the milk out of your butter, it may cause it to spoil.


After you're done rinsing, form your butter into a ball and squeeze out all the liquid you can. Now you're done!! This homemade butter is really good on some fluffly homemade buttermilk biscuits! I've also used my butter to make chocolate chip cookies. That's Sam's favorite dessert!

If you want to see a video of making butter, just go to Youtube. That's where I learned how to make it. Thanks for stopping by today. Please be patient with me until I have time to stamp again. I'll get in the groove soon, I promise!